Starting your first custom computer build is an exciting milestone. It is easy to get caught up in the thrill of unboxing a high-end graphics card or a sleek liquid CPU cooler, but there is one critical phase that beginners often rush through: cable management. Knowing how to manage cables in first pc build is the dividing line between a professional-looking, high-performing rig and a chaotic, dust-trapping mess.
If cable management is done poorly, the consequences go far beyond aesthetics. A dense nest of tangled wires acts as a physical barrier to airflow. This restriction prevents cool air from reaching your graphics card and processor, leading to thermal throttling, louder fan speeds, and a shorter lifespan for your expensive hardware. Loose cables can also migrate into spinning fan blades, causing annoying clicking sounds or physical damage to the fans. Furthermore, an unorganized interior makes future troubleshooting or component upgrades a nightmare, forcing you to untangle a web of wires just to swap out a single storage drive.
As an Amazon Associate we earn from qualifying purchases at no extra cost to you.

Our Top Picks


What You Need
Before you begin assembling your components, gather the right tools. Having these items on hand will save you from having to halt your build midway through to hunt for organizers.
| Item | Why You Need It | Optional? |
|---|---|---|
| Velcro Cable Straps | Allows you to bundle cables securely behind the motherboard tray while remaining easy to adjust or reuse during upgrades. | No |
| Small Plastic Zip Ties | Perfect for securing thin, permanent wires (like front panel headers) to the built-in tie-down points of the case. | No |
| Flush Cutters / Side Cutters | Safely snips the excess tails off plastic zip ties without leaving sharp edges that can scratch your hands or cut wires. | No |
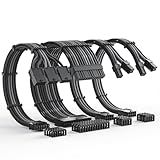
| AsiaHorse 12VHPWR Cable Extension Kit (around $29) | Replaces stiff, bulky stock power supply unit (PSU) cables with highly flexible, individually braided 16AWG wires and pre-installed cable combs for a clean aesthetic. | Yes |
| SNANSHI Flat Cat7 Ethernet Cable (around $5) | A 25-foot flat profile network cord that routes cleanly along the back of your desk or baseboards without adding bulk to your external cable bundles. | Yes |
Step-by-Step
Managing your cables is an ongoing process that runs parallel to assembling your hardware. Follow these steps to keep your interior clean and functional.
Step 1: Plan Your Routing Paths (Time: 10–15 Minutes)
Before mounting your motherboard into the chassis, study the design of your computer case. Look for the rubber grommets and cutouts surrounding the motherboard tray. Identify where the main power connectors will plug into your motherboard: the massive 24-pin ATX power port on the right side, and the 8-pin EPS (CPU power) port at the top left. Route the 8-pin EPS cable through the top-left cutout of the case *before* you screw down the motherboard or install a heavy CPU air cooler (which can weigh 2 to 3 lbs and block access to that corner entirely).
Step 2: Install and Prep the Power Supply (Time: 10 Minutes)
If you are using a modular power supply (typically ranging from 550W to 1000W+), only plug in the cables you actually need. For a standard build, this includes the 24-pin motherboard cable, the 8-pin CPU cable, and the necessary PCIe cables for your graphics card. Leave extra SATA or Molex cables in the box. Once the required cables are plugged into the power supply block, slide the unit into the bottom of the case and secure it with four screws. Push all the loose cable slack through to the back side of the motherboard tray, leaving the main cabin of the case completely empty.
Step 3: Route the Front Panel and Fan Wires (Time: 15–20 Minutes)
The thin, fragile wires coming from your case’s front panel (power switch, reset switch, HD audio, and USB ports) should be routed next. Thread them through the bottom-most cutouts of your motherboard tray. Because these wires are thin, bundle them together and use small plastic zip ties to anchor them tightly to the case’s chassis. Do the same for your case fan and RGB hub wires, routing them along the recessed channels of the motherboard tray to keep them flat and out of sight.
Step 4: Connect Main Power and GPU Cables (Time: 15–20 Minutes)
Pull the thick, bulky 24-pin ATX cable through the side grommet closest to the port and plug it in. Next, prepare your graphics card power. High-end modern GPUs require significant wattage and specialized connectors. Instead of using the stiff, ugly black cables that come with standard power supplies, you can use the AsiaHorse 12VHPWR Cable Extension Kit (around $29). Plug the extension into your PSU cable behind the tray, and route the soft, braided 16AWG wires through the bottom grommet directly to your GPU. Use the included acrylic cable combs to keep the individual wires perfectly parallel and neat where they are visible through your case’s glass window.
Step 5: Bundle and Secure the Back Panel (Time: 20–30 Minutes)
Move to the back side of the case. You will likely see a chaotic waterfall of wires. Group cables that travel in the same direction into vertical “trunks.” Use reusable Velcro straps to secure these trunks to the built-in anchor loops on the back of the motherboard tray. Keep your cable bundles flat rather than round. The clearance space behind a case side panel is often tight—usually between 0.5 and 0.8 inches. If your cable bundle is too thick, the side panel will bulge or refuse to slide closed.
Step 6: Manage Your External Desk Workspace (Time: 10–15 Minutes)
A clean PC interior deserves an equally organized exterior workspace. Once the PC is assembled and positioned on your desk, bundle your monitor, keyboard, and mouse cables together using Velcro wraps. To keep your high-speed internet connection neat, run a flat, low-profile wire like the SNANSHI Flat Cat7 Ethernet Cable (around $5) along the back edge of your desk, securing it to the desk legs to prevent dangling wires from cluttering your legroom.
Mistakes to Avoid
- Over-tensioning: Never pull cables so tight that they put physical strain on the motherboard ports or connector clips. This can crack solder joints or damage pins.
- Daisy-chaining high-power GPUs: Avoid using a single PCIe splitter cable to power a graphics card that draws more than 225 watts. Always run separate, individual PCIe cables from the PSU for high-draw cards.
- Blocking the PSU intake: Do not stuff excess cable slack directly into the open space next to your power supply fan. This blocks the intake air, causing the PSU to run hot and loud.
- Cutting cables with scissors: When trimming the tails off plastic zip ties, never use household scissors. It is incredibly easy to accidentally snip an adjacent fan or RGB wire. Use dedicated flush cutters instead.
How Often to Maintain Your Cables
Inside the PC, cable management is largely a “set-it-and-forget-it” task. However, you should perform a quick inspection every 6 to 12 months when you open the case for your routine dust cleaning. Check to ensure no zip ties have cracked or slipped, and verify that no loose cables have drifted close to your intake or exhaust fans.
When to Call a Pro or Replace Components
If you notice melted plastic on your power connectors, charred pins, or smell a distinct burning odor while running your PC under load, shut down the system immediately. Do not attempt to re-route or patch these cables; they must be replaced. If you are upgrading to a high-wattage system and find yourself overwhelmed by complex RGB controller hubs, fan splitters, and custom liquid cooling loops, it may be worth consulting a professional PC builder. Most local computer repair shops offer clean-up and cable routing services ranging from $50 to $150.
FAQ
Can bad cable management cause my PC to overheat?
Yes. While a few loose wires won’t affect temperatures, massive clumps of unmanaged cables block the direct path of cool air from your intake fans to your GPU and CPU heatsinks. This traps hot air inside the chassis, causing your system to run significantly hotter.
Should I use plastic zip ties or Velcro straps?
Use Velcro straps for the main, thick cable trunks because they are reusable and easy to adjust when you upgrade parts. Use plastic zip ties for thin, permanent wires like front panel buttons and RGB connections that you do not plan on moving.
What are cable extensions, and do I need them?
Cable extensions, such as the AsiaHorse 12VHPWR Cable Extension Kit (around $29), connect to the ends of your existing power supply cables. They are not strictly necessary, but they are highly recommended for first-time builders who want a clean, professional look, as they are much easier to bend and route than stiff factory cables.
How do I hide cables if my PC case does not have a PSU shroud?
If your case lacks a bottom shroud (or “basement”) to hide excess cables, route them along the very outer edges of the case frame. Use adhesive cable tie mounts to anchor the wires to the metal edges of the chassis so they stay out of sight of the main window.