Our Top Picks
 Thermaltake View 170 TG ARGB Black Micro-ATX Case;ARGB14.86 x 8.35 x 17.24 Inches10.25 PoundsCheck on Amazon
 DARKROCK EC2 ATX Mid Tower Gaming Computer PCATX/Micro-ATX/Mini-ITX17.6 x 8.6 x 15.2 InchesCheck on Amazon
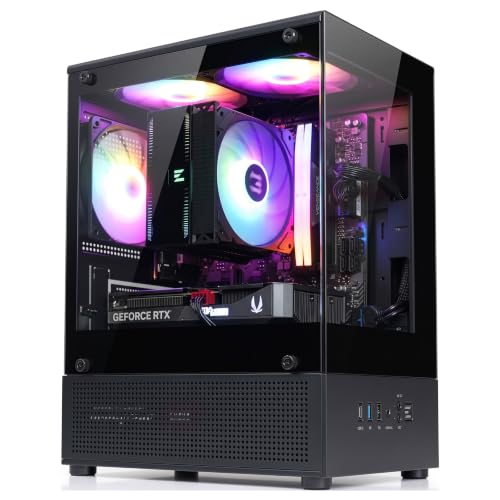 Zalman CUBIX-G Micro-ATX MATX Compact Mini Tower Gaming11.42 x 7.87 x 15.63 Inches7.05 PoundsCheck on Amazon

Top 3 picks at a glance

The Short Answer
If you are planning a compact desktop build and wondering what size fans fit in micro atx case layouts, the quick answer is that 120mm and 140mm fans are the industry standards. Among these, the 120mm fan is the most universally compatible size, fitting almost every Micro-ATX (mATX) case on the market today.
While larger ATX mid-tower cases—such as the DARKROCK EC2 (around $54)—have ample room for multiple oversized fans, Micro-ATX cases are much more compact, typically measuring between 14 to 16 inches in height. In these smaller enclosures, fan support is highly dependent on the specific mounting location:
As an Amazon Associate we earn from qualifying purchases at no extra cost to you.


- Front Mounts: Typically support two 120mm or two 140mm fans.
- Top Mounts: Usually accommodate two 120mm fans, though some high-airflow models can fit two 140mm fans.
- Rear Mounts: Almost exclusively restricted to a single 120mm fan due to the narrow width of the chassis.
- Bottom/Shroud Mounts: Occasionally support one or two 120mm fans to pull cool air directly onto the graphics card.
Budget-friendly options like the Cooler Master Q300L V1 (around $39) showcase this versatility by offering open-grid layouts that let you customize your cooling configuration, while panoramic models like the Thermaltake View 170 TG (around $59) arrive pre-installed with three 120mm ARGB fans to take the guesswork out of your initial setup.
Standard Sizes
When shopping for PC case fans, you will encounter dimensions listed in millimeters. However, understanding how these convert to inches and centimeters is crucial when planning your home office desk clearance or measuring internal cabinet spaces. Below is a comprehensive sizing chart for standard PC fans used in compact builds:
| Nominal Fan Size | Dimensions in Millimeters (mm) | Dimensions in Inches (in) | Dimensions in Centimeters (cm) | Typical mATX Case Placement |
|---|---|---|---|---|
| 80mm | 80 x 80 x 25 mm | 3.15 x 3.15 x 0.98 in | 8.0 x 8.0 x 2.5 cm | Rear exhaust (older or ultra-slim cases only) |
| 92mm | 92 x 92 x 25 mm | 3.62 x 3.62 x 0.98 in | 9.2 x 9.2 x 2.5 cm | Rear exhaust on narrow mini-towers |
| 120mm | 120 x 120 x 25 mm | 4.72 x 4.72 x 0.98 in | 12.0 x 12.0 x 2.5 cm | Universal (Front, Top, Rear, Bottom) |
| 140mm | 140 x 140 x 25 mm | 5.51 x 5.51 x 0.98 in | 14.0 x 14.0 x 2.5 cm | Front intake or Top exhaust (case-dependent) |
| 200mm | 200 x 200 x 30 mm | 7.87 x 7.87 x 1.18 in | 20.0 x 20.0 x 3.0 cm | Front panel (rare, cube-style cases only) |
While the standard thickness for PC fans is 25mm (about 1 inch), you can also find “slim” profile fans that measure 15mm (0.59 inches) in thickness. These are incredibly useful in compact Micro-ATX builds where thick radiators, tall RAM modules, or bulky motherboard heatsinks restrict your working room.
How to Measure Your Space
Before purchasing new case fans, it is always best to physically measure your Micro-ATX case or consult its spec sheet. Follow these step-by-step instructions to ensure a perfect fit:
- Identify the Mounting Rail Slots: Open your case side panel. Look at the metal frames at the front, top, and rear. You will see either single screw holes or long, vertical/horizontal mounting tracks. These tracks allow you to slide fans up or down to align them with your warm components.
- Measure the Screw Hole Spacing: PC fans are categorized by their outer frame size, but their screw holes are spaced closer together.
- For a 120mm fan, the screw holes are spaced exactly 105mm (4.13 inches) apart.
- For a 140mm fan, the screw holes are spaced exactly 125mm (4.92 inches) apart.
Measure the distance between the mounting holes on your case to see which standards are supported.
- Check for Motherboard Clearance: If you are mounting fans at the top of a Micro-ATX case, measure the distance from the top metal panel to the top edge of your motherboard. You generally need at least 30mm to 35mm of clearance to prevent a standard 25mm-thick fan from colliding with your CPU power cables or RAM sticks.
- Check Graphics Card (GPU) Clearance: If you plan to install thick front intake fans, measure the distance from the back of the front bracket to the edge of your graphics card. High-end GPUs can exceed 300mm in length, which might squeeze the space available for standard front fans.
By Room or Use Case
The ideal fan size and configuration for your Micro-ATX system depend heavily on where the computer is situated in your home and how you intend to use it.
The Compact Home Office Desktop (Silent & Low-Profile)
For a quiet workspace or home office, minimizing noise pollution is key. In these environments, larger 140mm fans are highly recommended for the front intake if your case supports them. Because 140mm fans have a larger surface area, they can spin at a lower speed (RPM) while moving the same volume of air (CFM) as a smaller fan spinning at high speeds. This keeps your system whisper-quiet during video calls and writing sessions. Look for fans rated under 20 decibels (dB) and cases like the Zalman CUBIX-G (around $44), which offer clean, professional aesthetics for a modern desk setup.
The Dedicated Gaming Nook (High Airflow & RGB)
If your Micro-ATX rig is tucked into a gaming corner, thermal management is your primary concern. Modern graphics cards and processors can pull upwards of 300 to 400 watts of power, generating substantial heat. For these setups, a high-airflow configuration consisting of three 120mm intake fans at the front and side, paired with a 120mm rear exhaust, is ideal. Choosing cases with built-in ARGB fans, like the Thermaltake View 170 TG, ensures excellent cooling out of the box while adding vibrant, customizable ambient lighting to your gaming desk setup.
The Media Center / HTPC Living Room Setup (Ultra-Slim)
A Home Theater PC (HTPC) placed inside a living room media console or TV stand faces severe space constraints. Airflow is often restricted by the cabinet doors and shelving. For these setups, utilizing slim 120mm x 15mm fans is a brilliant space-saving strategy. They provide critical active airflow to pull cool air into the cabinet without taking up precious internal volume, leaving plenty of room for low-profile CPU coolers and clean cable management.
Common Sizing Mistakes
Even experienced builders can run into clearance issues when working within the tight boundaries of a Micro-ATX chassis. Avoid these frequent pitfalls:
- Assuming 140mm Fits Everywhere: Just because a case supports 140mm fans at the front does not mean they will fit at the top or rear. Always double-check the manufacturer specs for each individual mounting zone.
- Confusing Radiator Sizes with Fan Sizes: If you are installing an All-in-One (AIO) liquid cooler, remember that a 240mm radiator uses two 120mm fans, while a 280mm radiator uses two 140mm fans. A Micro-ATX case that supports a 280mm radiator can easily fit 140mm fans, but a case limited to a 240mm radiator will only accept 120mm fans along that mounting panel.
- Overlooking Motherboard Heatsinks: Modern motherboards feature bulky metal heatsinks over the VRMs (voltage regulator modules) and rear I/O ports. These heatsinks can block top-mounted 140mm fans, forcing you to use 120mm fans or slim 15mm models instead.
- Ignoring Cable Routing Paths: Mounting thick fans in the top or bottom of a compact case can block the cutouts designed for routing your 8-pin CPU power cable or front panel audio connectors. Route your cables first before securing your fans into place.
FAQ
Can I mix 120mm and 140mm fans in the same Micro-ATX case?
Yes, absolutely. It is very common to install two 140mm fans at the front of a Micro-ATX case to quietly pull fresh air in, while using a single 120mm fan at the rear to exhaust warm air out. Just make sure your case’s mounting rails have screw holes for both sizes at those specific locations.
Do Micro-ATX cases come with fans pre-installed?
Many do, but it varies by price point. Budget cases around the $35 to $45 range, like the Cooler Master Q300L V1, typically include only one basic 120mm rear exhaust fan to keep costs low. Mid-range options around $55 to $65, like the Thermaltake View 170 TG, often come pre-installed with three high-quality 120mm ARGB fans, saving you from having to purchase additional cooling hardware separately.
How many fans do I actually need in a Micro-ATX case?
For standard home office use or light gaming, a minimum of two fans is recommended: one front intake to pull cool air in, and one rear exhaust to push hot air out. For high-performance gaming or content creation builds, a three- or four-fan configuration (two/three intake, one exhaust) is ideal to maintain safe hardware temperatures.
What is the difference between 3-pin and 4-pin PWM fans?
A 3-pin fan runs at a constant speed unless your motherboard adjusts the voltage supply. A 4-pin PWM (Pulse Width Modulation) fan allows your computer to precisely control the fan speed based on live hardware temperatures. This means your system can stay completely silent while you are typing a document, and automatically ramp up the fan speeds when you launch a demanding game or render a video.
As we look ahead to 2026, compact home office setups continue to prioritize whisper-quiet acoustics and efficient thermal management. Choosing the right fan sizes for your Micro-ATX case is one of the simplest and most effective ways to build a reliable, high-performing computer that fits beautifully into your home workspace.