Integrating high-performance technology into a custom home office, bespoke desk build, or dedicated media room is a design challenge that goes far beyond raw processing power. When planning a custom-built system, many homeowners and designers focus on the cabinetry, the wood finishes, and the cable routing, only to make critical mistakes when selecting the core hardware.
The most common mistake when figuring out how to choose graphics card for custom kit setups is treating the graphics card (GPU) as an isolated tech spec. Buyers often purchase a massive, high-power card based solely on online benchmarks, only to realize too late that it cannot vent heat properly inside a custom wooden enclosure, or that its stock fans produce a high-pitched whine that ruins the tranquility of the room. Another frequent misstep is purchasing a graphics card without checking its physical board layout, leaving you with a custom liquid-cooling loop kit and a waterblock that do not physically align.
As an Amazon Associate we earn from qualifying purchases at no extra cost to you.



To design a workspace that is as quiet and visually integrated as it is powerful, you must balance spatial footprints, thermal materials, and acoustic comfort from the start.
Our Top Picks


Top 3 picks at a glance
Decide These 3 Things First
Before browsing specific graphics card models or custom cooling components, you must establish three foundational parameters of your custom installation:
- Your Thermal and Acoustic Tolerance: Decide if your custom kit will rely on traditional air cooling or a custom liquid-cooled loop. Air-cooled cards are simpler to install but require massive airflow clearance and generate more ambient noise. Liquid-cooled cards utilize custom waterblocks to transfer heat to remote radiators, keeping the immediate workspace completely silent.
- The Physical Mounting Orientation: Will the card sit horizontally on a motherboard inside a standard chassis, or will it be mounted vertically or flat using a PCIe riser cable inside a custom desk drawer or wall-mounted art piece? This dictates the maximum card thickness and weight your setup can support.
- The Display and Workload Requirements: Determine if the system is a multi-monitor productivity hub, a high-end design workstation, or a hidden media center. A simple multi-display setup does not require a power-hungry flagship card, whereas rendering and high-end gaming demand top-tier silicon and robust cooling infrastructure.
Physical Size and Spatial Footprint
In custom furniture and specialized cabinetry, every millimeter of clearance matters. Graphics cards vary wildly in physical dimensions, and failing to measure your enclosure is a recipe for project delays.
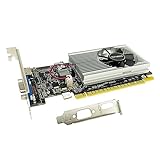
Entry-level, low-profile cards are designed for compact, small-form-factor (SFF) custom kits. These cards typically measure under 6.5 inches in length, less than 2.7 inches in height, and occupy a single slot (approximately 0.8 inches in thickness). They fit easily into shallow drawers, media consoles, or minimalist wall mounts without requiring specialized ventilation pathways.
Conversely, modern high-end graphics cards are massive. Flagship models can stretch up to 13.5 inches in length, 5.9 inches in width, and occupy 3 to 4 expansion slots (up to 3.2 inches in thickness). When housing these cards in custom enclosures, you must account for an additional 1.5 to 2 inches of clearance for power cables, which often plug into the top of the card and cannot be bent sharply without risking electrical failure.
Material Compatibility and Custom Waterblocks
For high-end custom kits where silence and aesthetics are paramount, custom liquid cooling is the gold standard. This process involves removing the factory-installed fan assembly and replacing it with a specialized GPU waterblock. Looking ahead to 2026, clean desk aesthetics and silent computing continue to drive the integration of custom copper blocks into high-end furniture builds.
Material selection here is critical to prevent system degradation. Premium waterblocks are constructed from high-purity electrolytic copper, often finished with nickel plating for a polished look and corrosion resistance. The top covers are typically made of clear acrylic (PMMA) to showcase the coolant or solid black acetal (POM) for a stealthy, architectural appearance.
When selecting a graphics card for a custom loop, you must ensure that a matching waterblock exists for that exact printed circuit board (PCB). High-end blocks, such as a premium copper waterblock designed for an Asus Rog Astral GeForce RTX 5090 (priced around $280) or a copper block for a Sapphire Radeon RX 7900 XTX Nitro+ (priced around $260), are engineered to tolerances of less than 0.1mm. They must match the specific layout of the voltage regulator modules (VRMs) and memory chips on those exact boards. Never mix aluminum components with copper or brass components in the same liquid loop, as this causes galvanic corrosion that will destroy your custom kit within months.
Thermal Management and Power Construction
The electrical construction of your chosen graphics card directly dictates the thermal load you must vent from your custom furniture or enclosure.
Low-power, entry-level cards operate on 19W to 50W of power, drawing all their electricity directly from the motherboard’s PCIe slot. These cards generate minimal heat and can often operate with passive heatsinks (no fans), making them completely silent and ideal for enclosed, unventilated cabinets.
Mid-range cards step up to a power draw of 150W to 250W, requiring a single 8-pin power connector. These demand active airflow, requiring intake and exhaust cutouts in your custom cabinetry.
Flagship cards are heavy-duty thermal generators, pulling anywhere from 350W to over 500W of power. They require specialized high-gauge power cables (such as the 12V-2×6 standard) and generate a massive amount of heat. If you place a 450W card inside a sealed custom wooden desk without dedicated intake fans and exhaust grilles, the internal air temperature will quickly rise past safe operating limits, causing the card to throttle its performance or shut down entirely.
Acoustic Comfort and Thermal Performance
A noisy fan can ruin the ambiance of a beautifully curated room. When choosing a graphics card for a custom kit, evaluate the acoustic profile under load.
Standard air-cooled cards rely on two or three high-RPM fans. Under heavy rendering or gaming workloads, these fans can spin up to 2,000 RPM or higher, generating noise levels between 40 dB and 48 dB. In a quiet room with a ambient noise floor of 30 dB, this is highly noticeable.
By opting for a custom liquid-cooling kit with a dedicated copper GPU waterblock, you shift the cooling duty to larger, slower-spinning 120mm or 140mm fans mounted to a remote radiator. Because these fans have more surface area to work with, they can run at low speeds (800 to 1,200 RPM) to dissipate the same amount of heat. This keeps the system’s acoustic output under a whisper-quiet 28 dB to 32 dB, even during intensive tasks.
Price Tiers and Value Propositions
Budgeting for a custom kit requires balancing the cost of the graphics card with the cost of the integration hardware (cables, mounts, and cooling blocks).
- The Entry/Display Tier ($35 to $100): Cards in this range, such as a basic 1GB GT 210 (around $37) or a 4GB GT 730 (around $89), are designed for basic display outputs, multi-monitor home office desks, and low-power media setups. They do not support custom liquid cooling blocks, but their low power draw makes them easy to integrate into passive, fanless custom furniture.
- The Mid-Range Performance Tier ($300 to $600): This tier offers excellent performance for design work, photo editing, and casual gaming. These cards require active ventilation, and select models have compatible waterblocks available from specialized manufacturers.
- The High-End/Flagship Tier ($800 to $2,000+): Designed for heavy 3D rendering, 4K video editing, and enthusiast gaming. These cards are prime candidates for custom liquid-cooling kits, but remember to budget an additional $250 to $300 for the compatible copper waterblock, plus the cost of radiators, fittings, and pumps.
Warranty and Modding Protections
Integrating a graphics card into a custom liquid-cooled kit requires dismantling the original card. You must unscrew the factory-installed heatsink and fan shroud to mount your custom copper block.
This process carries inherent risks. Some graphics card manufacturers place “Warranty Void If Removed” stickers over the structural screws. While consumer protection laws in some regions protect your right to modify hardware, dealing with warranty claims on a dismantled card can be difficult. Look for manufacturers that explicitly permit the removal of the stock cooler for liquid cooling, provided you reinstall the original cooler before returning the card for a warranty claim. Most reputable manufacturers offer a 2-to-3-year warranty, which is vital security when investing in premium hardware.
Delivery, Unboxing, and Assembly Complexity
When your graphics card and custom cooling blocks arrive, inspect the packaging immediately for transit damage. Heavy graphics cards require dense foam packaging to prevent the PCB from bending during shipping.
The assembly of a custom-cooled GPU kit requires a clean, static-free workspace, precision screwdrivers, and patience. You will need to clean the factory thermal paste off the GPU die using high-purity isopropyl alcohol, apply fresh thermal compound, and carefully cut and place thermal pads (usually ranging from 0.5mm to 2.0mm in thickness) onto the memory chips and VRMs as specified by your waterblock manual. Tighten the waterblock screws in a crisscross pattern to ensure even pressure across the silicon die; over-tightening can crack the circuit board, while under-tightening leads to poor thermal contact and overheating.
Spec Checklist
Use this reference table to align your custom kit requirements with the correct hardware class:
| Feature / Specification | Budget Tier (Display & Office) | Mid-Range Tier (Design & Gaming) | Premium Tier (Enthusiast & Rendering) |
|---|---|---|---|
| Typical Card Price Range | $35 – $120 | $300 – $700 | $800 – $2,000+ |
| Average Power Draw | 15W – 50W | 150W – 250W | 300W – 500W+ |
| Typical Physical Length | 5.5 to 6.8 inches | 8.5 to 11.0 inches | 11.5 to 13.8 inches |
| Cooling Type | Passive (silent) or small single fan | Dual or triple active fans | Triple fans or custom liquid waterblock |
| Custom Loop Compatibility | None (Not supported) | Moderate (Select models only) | Excellent (Widely supported by block makers) |
| Acoustic Range Under Load | 0 dB (Passive) to 25 dB | 35 dB – 42 dB | 40 dB – 48 dB (Air) / <30 dB (Liquid) |
Red Flags
When shopping for components for your custom kit, watch out for these critical warning signs:
- Proprietary or Non-Standard PCB Layouts: If you plan to use a custom liquid block, avoid graphics cards with highly customized proprietary circuit boards unless a block manufacturer explicitly states they make a matching block for that exact model number. Stick to “reference design” boards or highly popular premium models.
- Under-specced Power Supplies: High-end cards can experience brief power spikes that exceed their rated wattage. If your system power supply is rated exactly at the card’s average draw, your custom kit will suffer from random crashes and instability. Always leave a 150W to 200W buffer.
- Mixed-Metal Cooling Loops: Never pair an aluminum radiator or aluminum fittings with a copper or nickel-plated copper GPU waterblock. This creates an unintended battery cell, leading to rapid galvanic corrosion that clogs your system and leaks coolant onto your expensive hardware.
- Lack of Structural Support: Heavy, air-cooled graphics cards weighing 4 to 6 pounds will sag when mounted horizontally in a standard motherboard slot. Over time, this stress can crack the PCIe slot or the card’s connector. Always use a structural support bracket or a vertical mounting kit.
FAQ
Can I use a low-profile graphics card in a custom desk-integrated PC?
Yes. Low-profile, low-power graphics cards are excellent for desk-integrated PCs where space is limited and silence is a priority. Because they draw minimal power (often under 50W) and generate very little heat, they can run reliably in shallow compartments without complex cooling ductwork or high-noise fans.
Does installing a custom copper waterblock void my graphics card warranty?
This depends entirely on the manufacturer. Some brands are modder-friendly and allow you to remove the stock cooler as long as you do not physically damage the circuit board and can return the card to its original factory state if you need to submit a warranty claim. Always read the manufacturer’s warranty policy regarding cooler removal before buying.
Why are custom waterblocks so specific to individual graphics card models?
Custom waterblocks are engineered to make direct physical contact with the GPU core, the memory chips, and the power delivery components simultaneously. Because different manufacturers arrange these components differently on the circuit board, a waterblock must be CNC-milled to match the exact layout of a specific card model down to fractions of a millimeter.
How do I prevent galvanic corrosion in my custom liquid-cooled setup?
To prevent galvanic corrosion, ensure that all metal parts in contact with your cooling fluid are made of the same or highly compatible metals, such as copper, brass, and nickel. Avoid introducing any aluminum components into a loop that contains copper or brass, and always use a high-quality, pre-formulated coolant that contains anti-corrosive inhibitors.