Building your first computer is an incredibly rewarding milestone. You have carefully selected your processor, graphics card, and motherboard, and you are ready to assemble them into a high-performance machine. However, one of the most nerve-wracking moments for any beginner is learning how to apply thermal paste first pc build. Though it seems like a minor detail, this tiny tube of grey compound plays a massive role in keeping your system stable and cool.
Thermal paste is a highly conductive material designed to fill the microscopic air gaps between the top of your CPU (the Integrated Heat Spreader, or IHS) and the cold plate of your CPU cooler. Metal-on-metal contact looks smooth to the naked eye, but under a microscope, both surfaces are filled with tiny valleys. Without paste, these pockets trap air, which is a terrible conductor of heat. If you apply the paste incorrectly, your CPU cannot transfer its heat efficiently to the cooler. This leads to immediate thermal throttling, where your processor intentionally slows down to prevent self-destruction, or worse, sudden system shutdowns when your CPU temperature spikes past 90 degrees Celsius under load.
As an Amazon Associate we earn from qualifying purchases at no extra cost to you.


Whether you are building a budget office PC or a high-end gaming rig, getting this step right ensures your processor runs at its advertised clock speeds without overheating. Let us look at exactly what you need to get the job done cleanly and professionally.
Our Top Picks

What You Need
Before you open any syringes, clear off a clean, static-free workspace. Having the right tools on hand prevents messy mistakes and ensures a seamless installation process.
| Item | Why You Need It | Optional? |
|---|---|---|
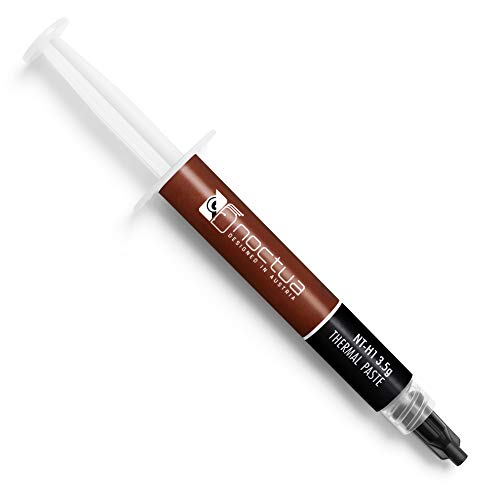
| Thermal Paste | Bridges the microscopic air gaps between your CPU and cooler to transfer heat efficiently. Highly recommended options include the Noctua NT-H1 3.5g (priced around $8) or the premium Thermal Grizzly Kryonaut 1 Gram (priced around $11). | No |
| Isopropyl Alcohol (90%+) | Cleans off any manufacturing oils, dust, or pre-applied thermal paste from the CPU and cooler surfaces. | No (unless using pre-treated wipes) |
| Microfiber Cloth or Coffee Filters | Used to wipe down surfaces. Coffee filters are ideal because they do not shed fibers or leave lint behind like paper towels do. | No |
| Cleaning Wipes | Specially formulated wet and dry wipes for removing compound. The Thermal Grizzly Kryonaut package conveniently includes 12 wipes (6 wet and 6 dry). | Yes |
| Anti-Static Wrist Strap | Protects your sensitive motherboard and CPU components from static electricity damage. | Yes |
Step-by-Step
Applying thermal paste is a quick process, but it requires patience and a steady hand. Follow these step-by-step instructions to ensure a perfect application on your very first try.
Step 1: Prepare the CPU and Cooler Surfaces (Time: 5 Minutes)
If you are installing a brand-new CPU out of the box, the metal surface should be clean, but it may still have residual manufacturing oils. If you are using a cooler that came with pre-applied paste and you prefer to use your own high-performance compound, you must clean the old paste off completely. Dampen your lint-free microfiber cloth or coffee filter with 90% or higher isopropyl alcohol. Gently wipe the CPU surface (measuring roughly 37.5 mm x 37.5 mm for modern Intel sockets, or 40 mm x 40 mm for AMD sockets) until it shines. Wipe the copper or aluminum base plate of your CPU cooler as well. Let both surfaces dry completely for two minutes before proceeding.
Step 2: Choose Your Application Pattern (Time: 2 Minutes)
There are several schools of thought on the best shape to use, but two methods reign supreme for beginners because they guarantee even spread without air bubbles:
- The Pea Method: Squeeze a single, round dot of paste directly in the center of the CPU. The dot should be approximately 4 to 5 millimeters in diameter (roughly the size of a green pea or a small black bean).
- The X Method: Draw a thin “X” from corner to corner on the CPU face. This is highly effective for larger, modern processors because it ensures the compound reaches the outer corners when the cooler is mounted.
Do not worry about spreading the paste manually with a card unless your paste specifically comes with a spatula tool and instructs you to do so. The mounting pressure of your cooler will spread the paste naturally.
Step 3: Apply the Paste (Time: 1 Minute)
Position your syringe of thermal paste directly over the center of the CPU. If you are using the pea method, gently press the plunger until a small, controlled dot sits in the middle. If you are using a high-viscosity paste like the Noctua NT-H1, it may require a tiny bit of force to start flowing, so push slowly to avoid dumping too much compound at once. Stop pushing before you pull the syringe away to prevent leaving a messy “tail” of paste across your CPU.
Step 4: Mount the CPU Cooler (Time: 5 Minutes)
Align your CPU cooler bracket directly over the mounting holes on your motherboard. Lower the cooler straight down onto the CPU. Try to avoid sliding, tilting, or twisting the cooler once it makes contact with the paste, as this can introduce air bubbles or push the compound off to one side. Hold the cooler steady with one hand while you begin securing the mounting screws with the other.
Step 5: Tighten and Secure (Time: 2 Minutes)
To ensure the paste spreads perfectly and evenly across the processor, tighten the cooler screws in a diagonal, cross-pattern (top-left, bottom-right, top-right, bottom-left). Turn each screw two or three times before moving to the next one. Continue this pattern until all screws are hand-tight. Do not over-tighten, as excess force can damage the delicate motherboard traces or bend the pins in the CPU socket.
Mistakes to Avoid
Even experienced builders sometimes fall into common traps. Keep these crucial mistakes in mind to protect your hardware:
- Leaving the Plastic Peel On: Many CPU coolers come with a clear, protective plastic film on the bottom of the copper block. Failing to peel this off before mounting is the single most common cause of instant overheating in new builds. Always double-check that the plastic is gone!
- Using Too Much Paste: More is not better. Excess paste will squeeze out of the sides, spilling onto your motherboard socket and pins. While non-conductive pastes like Noctua NT-H1 will not cause an electrical short, the mess is incredibly difficult to clean.
- Spreading with a Bare Finger: Never use your bare finger to smooth out thermal paste. The natural oils on your skin will contaminate the compound, degrading its thermal performance.
- Reusing Old Paste: If you ever lift your CPU cooler off the processor—even for just a second to check your alignment—you must clean off the paste and apply a fresh batch. Re-mounting a cooler on used, partially dried paste introduces trapped air pockets.
How Often to Replace Thermal Paste
Once your computer is assembled, you do not need to worry about the thermal paste for a long time. High-quality compounds are engineered to remain stable under high thermal loads for years. For standard office systems or casual gaming PCs, replacing the thermal paste every 3 to 5 years is more than sufficient.
As we look ahead to 2026, desktop processors are pushing higher power limits, sometimes exceeding 250 watts under boost conditions. If you run your system under heavy, sustained workloads—such as 3D rendering, video editing, or heavy overclocking—the constant heat cycles can dry out the paste faster. In these demanding environments, refreshing your paste every 2 years keeps your cooling efficiency at its absolute peak.
When to Call a Pro or Replace
Applying thermal paste is a straightforward DIY task, but there are times when it is best to seek professional help or replace your components entirely.
You should replace your thermal paste if you notice a sudden, unexplained rise in your CPU idle temperatures (for example, jumping from a normal 35°C to 55°C) or if your cooling fans constantly spin at 100% volume during basic web browsing. If your computer randomly shuts down while gaming, a dried-out thermal barrier is the prime suspect.
However, you should call a professional technician if you accidentally spill thermal paste into the delicate pins of your motherboard socket, or if you feel uncomfortable handling heavy dual-tower air coolers that weigh over 1,000 grams. If you are working with liquid metal compounds—which are electrically conductive and can easily ruin your motherboard if spilled—hiring a pro is a smart, insurance-friendly move for a beginner.
FAQ
Does thermal paste expire in the tube?
Yes, thermal paste can dry out or separate inside the syringe over time. Most manufacturers list a shelf life of 2 to 3 years for an unopened or tightly sealed tube stored in a cool, dark place. If you squeeze out some paste and it comes out watery or extremely clumpy, discard it and buy a fresh tube.
Can I use household items like toothpaste as a temporary alternative?
Absolutely not. While some household substances can conduct heat briefly, they dry out within hours, contain water that can cause a short circuit, or can permanently corrode the delicate copper and aluminum components of your cooling system.
Is it better to use pre-applied thermal paste?
Pre-applied thermal paste is perfectly fine for stock coolers and budget builds. However, aftermarket pastes like Thermal Grizzly Kryonaut or Noctua NT-H1 offer superior thermal conductivity, which can lower your CPU temperatures by an additional 3°C to 8°C compared to generic pre-applied pads.
What happens if I get thermal paste on my motherboard?
If the paste is non-conductive (like most modern silicone- or ceramic-based pastes), it will not cause an immediate electrical short. Do not panic. Simply dip a soft toothbrush in 99% isopropyl alcohol and gently scrub the paste away, then let the board dry completely before powering it on.