Building a custom desktop using a barebones kit is one of the most satisfying ways to upgrade a home office. These kits arrive as a pre-assembled package containing a computer chassis, a motherboard, and a power supply (ranging from compact 65W external adapters to robust 500W internal units). However, because they lack memory and storage, you must install these components yourself to make the system functional.
While installing RAM is a straightforward DIY task, doing it incorrectly can lead to severe consequences. A single slip-up can result in electrostatic discharge (ESD) that permanently fries your motherboard, bent or broken pins in the memory slots, or a system that refuses to boot, leaving you with a blank screen. If you apply too much physical pressure, you risk cracking the multi-layered circuit board of a $150 to $400 barebones unit. Taking a methodical, careful approach ensures your system runs smoothly from the very first power-up.
As an Amazon Associate we earn from qualifying purchases at no extra cost to you.

Our Top Picks

What You Need
Before opening your barebones kit, gather the necessary tools and components. Working on a clean, organized surface prevents lost screws and static buildup.
| Item | Why You Need It | Optional? |
|---|---|---|
| Barebones Desktop Kit | The base chassis, motherboard, and power supply unit (weighing anywhere from 3 to 12 pounds). | No |
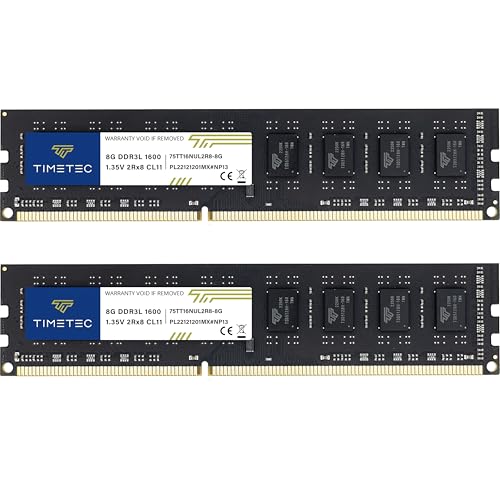
| Compatible RAM Modules | Provides volatile memory for your operating system. For DDR3-compatible systems, kits like the Timetec 16GB KIT(2x8GB) DDR3L/DDR3 1600MHz UDIMM (around $37) or the Timetec 8GB KIT(2x4GB) DDR3L/DDR3 1600MHz UDIMM (around $24) offer excellent dual-channel performance. | No |
| Phillips #2 Screwdriver | Used to remove the outer casing screws (typically 3mm to 6mm in size) of the barebones chassis. | No |
| Anti-Static Wrist Strap | Grounds your body to prevent electrostatic discharge from damaging sensitive silicon pathways. | Yes (but highly recommended) |
| Non-Magnetic Parts Tray | Keeps small chassis screws from rolling off your desk or getting lost in carpet fibers. | Yes |
Step-by-Step
Follow these steps carefully to open your barebones kit, locate the memory slots, and securely seat your new RAM modules.
Step 1: Prep Your Workspace and Ground Yourself (Time: 5 minutes)
Clear a flat, non-metallic table—ideally wood or laminate. Avoid working on carpeted floors, as walking on carpet generates significant static electricity. Unbox your barebones kit and place it on the table. If you have an anti-static wrist strap, clip the alligator end to a metal portion of the computer chassis or a grounded metal object. If you do not have a strap, touch a bare metal object (like a metal desk leg or a grounded appliance) to discharge any static electricity from your body before touching any internal computer components.
Step 2: Open the Barebones Chassis (Time: 10 minutes)
Unplug the barebones unit from any power source. Locate the screws holding the side panel or top cover in place. Depending on the design of your kit, you will typically find two to four Phillips screws on the rear or bottom of the unit. Carefully remove these screws and place them in your parts tray. Gently slide or lift the cover off the chassis to expose the motherboard. For compact mini-PC barebones kits, you may need to unscrew the rubber feet on the bottom to access the motherboard compartment.
Step 3: Locate the RAM Slots (Time: 3 minutes)
Look at the motherboard to identify the memory slots (also called DIMM or SO-DIMM slots). Standard desktop kits use long DIMM slots (roughly 5.25 inches in length), while ultra-compact mini-PC kits use shorter SO-DIMM slots (roughly 2.6 inches in length). If your barebones kit supports dual-channel memory, it will have at least two slots. Consult your kit’s manual to identify which slots to populate first if you are not using all available slots; typically, using slots labeled “DIMM_A1” and “DIMM_B1” yields the best performance.
Step 4: Align and Insert the RAM Modules (Time: 5 minutes)
Remove your RAM modules from their protective anti-static packaging, handling them only by their plastic edges. Avoid touching the gold-plated contact pins. Locate the small plastic notch along the bottom edge of the RAM module. This notch is offset from the center, meaning the module can only be inserted in one direction. Align this notch with the plastic ridge inside the motherboard’s RAM slot.
If you are using desktop UDIMMs, such as the dual-voltage Timetec 16GB or 8GB DDR3/DDR3L kits, push open the plastic locking tabs on either end of the motherboard slot. Press the RAM module straight down into the slot with firm, even pressure using both thumbs on the top corners of the module. You will hear a distinct click as the locking tabs snap back into place, securing the module. For mini-PC SO-DIMM slots, slide the module into the slot at a 30-degree angle, then press it downward flat against the board until the side metal clips snap outward to lock it.
Step 5: Reassemble and Perform the First Boot (Time: 7 minutes)
Double-check that the RAM modules are perfectly level and that the locking tabs are fully closed. Slide the chassis cover back onto the frame and secure it with the screws from your parts tray. Plug in the power supply cord, connect a monitor, keyboard, and mouse, and press the power button. If the installation was successful, the system will power on, pass the Power-On Self-Test (POST), and display the BIOS setup screen or a boot logo. You can enter the BIOS (usually by pressing the Delete or F2 key during boot) to verify that the system correctly recognizes the full capacity of your installed RAM.
Mistakes to Avoid
- Forcing the Module in Backwards: The off-center notch on the RAM stick is designed to prevent improper installation. Never force a module into a slot if it does not slip in easily; flip it 180 degrees and try again.
- Mixing Voltages and Speeds: Placing high-voltage 1.5V RAM into a system designed strictly for low-voltage 1.35V DDR3L can cause system crashes or damage the memory controller. Fortunately, dual-voltage modules (like the Timetec DDR3L UDIMM lines) dynamically support both 1.35V and 1.5V profiles to eliminate compatibility issues.
- Failing to Fully Seat the Module: If the side tabs do not click into place automatically, the RAM is not fully seated. Operating a system with partially connected pins can short-circuit the RAM slot.
- Ignoring Dual-Channel Configurations: If you have a 2-stick kit (like a 2x4GB or 2x8GB configuration), placing them in adjacent slots on a 4-slot motherboard often forces them into single-channel mode, cutting your memory bandwidth in half. Always space them out according to the motherboard manual (usually slots 2 and 4).
How Often
RAM is generally an install-and-forget component. Once seated correctly, it does not require physical maintenance. However, as software requirements change, you may need to upgrade your capacity. As we look toward the processing demands of 2026, standard office tasks and multitasking will benefit greatly from at least 16GB of system memory. Additionally, you should open your desktop chassis every 6 to 12 months to blow out accumulated dust using a can of compressed air, as dust buildup can insulate components, trap heat, and degrade performance.
When to Call a Pro or Replace
If you boot up your barebones desktop and hear a series of repeated beeps, or if the motherboard’s diagnostic LEDs display a red “DRAM” error light, turn off the system immediately. First, try removing and reseating the RAM modules. If the system still fails to boot, or if you experience frequent Blue Screen of Death (BSOD) crashes with error codes like “Memory Management,” your RAM may be defective or incompatible with the motherboard’s chipset.
If you notice physical damage on the motherboard—such as a broken plastic locking tab, a cracked DIMM slot, or a burnt smell—do not attempt to fix it yourself. In these scenarios, contact a professional PC technician or reach out to the barebones kit manufacturer for a replacement unit under warranty.
FAQ
How do I know if my barebones kit requires desktop UDIMMs or laptop SO-DIMMs?
This depends entirely on the physical size of your barebones kit. Mini-PCs (which typically measure less than 6 inches by 6 inches) require smaller, 204-pin or 260-pin SO-DIMM modules. Larger mini-ITX or micro-ATX barebones tower kits use standard 240-pin or 288-pin UDIMMs. Check your product manual or the manufacturer’s website before purchasing memory.
Is DDR3L memory compatible with standard DDR3 motherboards?
Yes. DDR3L is “low-voltage” memory designed to run at 1.35V, but high-quality modules are backward-compatible and can run at the standard 1.5V required by older DDR3-only motherboards. Standard DDR3 modules, however, cannot run in motherboards that strictly require 1.35V DDR3L.
Can I mix different capacities of RAM, like a 4GB stick and an 8GB stick?
While your computer may boot with mixed capacities, it is not recommended. Mixing different brands, speeds, or capacities disables dual-channel mode, forcing the system to run in a slower “asymmetric” or single-channel mode. It is always best to purchase matched kits, such as a 2x8GB or 2x4GB pack, to ensure maximum stability and speed.
What should I do if my system boots but does not show the full amount of installed RAM?
First, turn off the PC, unplug it, and verify that both modules are fully pressed down and locked into their slots. If they are, boot into your operating system, open the Task Manager (or System Information), and check if some memory is “System Reserved” for integrated graphics. If the BIOS only detects one stick, test each stick individually in the primary slot to determine if you have a faulty RAM module or a dead motherboard slot.