Power limit settings determine how much power your CPU and GPU are allowed to draw under load, which directly controls heat, fan noise, boost clocks, and stability. For gaming, the goal is not to unlock unlimited power, but to find the point where you keep maximum sustained frame rate consistency without thermal throttling or wasted wattage. Prioritize a stable GPU power limit that holds your target boost clock, a CPU power limit that prevents temperature spikes in CPU-heavy scenes, and complementary settings like temperature limits and fan curves that keep the system quiet. Getting this balance right as of early 2026 means less stuttering, lower electricity use, and longer component life with no loss in real-world gaming performance.
Our Top Picks
Pros & cons
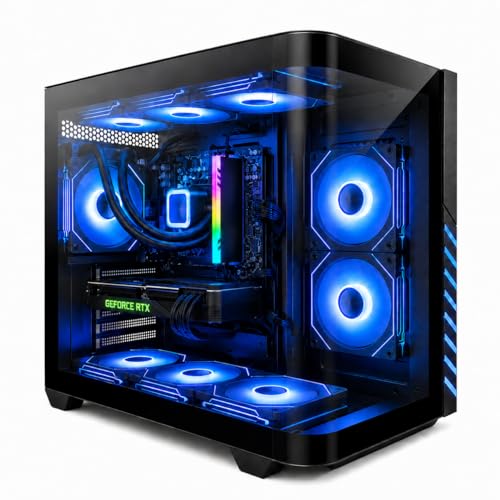
- Built-in 11.3 inch smart display shows live temps and usage
- 850W 80+ Gold PSU leaves headroom for upgrades
- Arrives fully assembled with Windows 11 Home installed
- Monitor must connect to the graphics card, not motherboard ports
- 360mm liquid cooler takes up significant case space
Pros & cons
- 10-core i5-14400F pairs with an 8GB RTX 5060 GPU
- 1TB NVMe SSD offers fast load times and storage
- Backed by 1 year of parts and labor warranty
- Only 2 USB-A 3.2 ports limit fast peripheral connections
- RGB lighting customization options aren't detailed in the listing



Top 3 picks at a glance
Quick Recommended Settings
| Setting | Recommended value | Why |
|---|---|---|
| GPU Power Limit (MSI Afterburner) | 90% to 100% for most cards, 105% to 110% only for high-end overclocking | Holds boost clocks while cutting heat and noise; going above 100% adds little for most games |
| GPU Temp Limit | 83°C to 86°C, linked to power limit | Prevents thermal throttling without forcing fans to 100% |
| CPU Package Power Limit (PL1 / PL2) – Intel | Set PL1 = Processor Base Power (PBP), PL2 = 1.25x PL1 | Maintains base performance while limiting short-burst power spikes in games |
| CPU PPT / Package Power Tracking – AMD Ryzen | 65W CPU: 76W PPT, 105W CPU: 142W PPT, Eco Mode: 65W PPT | Matches AMD stock spec for efficient all-core boost during gaming |
| CPU Undervolt Offset | Intel: -25mV to -50mV, AMD Curve Optimizer: -10 to -20 per core | Lowers power draw at same frequency, improves thermal headroom |
| Windows Power Mode | Settings > System > Power > Power mode: Best Performance (desktop) / Balanced (laptop) | Ensures power limits you set are not overridden by OS power saver |
| FPS Cap / Frame Limiter | Cap 3 fps below monitor refresh rate (e.g., 141 fps on 144Hz) | Reduces GPU load and power draw when CPU/GPU would otherwise run uncapped |
Setting-by-Setting
GPU Power Limit – MSI Afterburner Path: MSI Afterburner > Power Limit Slider
Set the slider to 95% as a balanced starting point for NVIDIA GeForce RTX 40-series and AMD Radeon RX 7000-series cards. The trade-off is straightforward: lowering to 85% to 90% significantly reduces heat and fan noise with minimal clock speed reduction, while raising to 105% to 110% only helps if your cooler can handle the extra wattage and your card is power-limited rather than voltage or temperature limited. To apply, open MSI Afterburner, drag the Power Limit (%) slider, check Link between Power Limit and Temp Limit, click the checkmark icon, then click Save to Profile 1. Test stability with a 10-minute run of a demanding game or Unigine Heaven.
As an Amazon Associate we earn from qualifying purchases at no extra cost to you.



GPU Temp Limit – MSI Afterburner Path: MSI Afterburner > Temp Limit
Set Temp Limit to 83°C for quiet operation or 86°C for maximum boost duration. This setting works in tandem with power limit; the card will throttle whichever limit is hit first. A lower temp limit forces earlier downclocking but keeps fans quieter and prevents junction temperature spikes. A higher limit lets the card sustain boost longer at the cost of louder fans. Keep Temp Limit linked to Power Limit so both adjust together and you avoid an artificial thermal cap that overrides your power tuning.
CPU PL1 and PL2 – BIOS Path: BIOS > Advanced > Overclocking > CPU Power Management Control
For Intel Core 13th and 14th Gen, PL1 is the sustained power limit and PL2 is the short-burst limit. Recommended exact values: If your CPU has a PBP of 125W (e.g., Core i7-14700K), set PL1 to 125W and PL2 to 155W with Tau set to 56 seconds. The trade-off: Stock motherboard defaults often set PL1/PL2 to 253W or Unlimited, which increases heat and power for negligible gaming gains. Lowering to Intel spec reduces cooler requirements and prevents thermal throttling in long sessions. To change, restart and press Delete to enter BIOS, navigate to CPU Power Management Control, set Long Duration Power Limit (PL1) and Short Duration Power Limit (PL2) manually, set CPU Current Limit to 307A or Auto, press F10 to save.
AMD PPT, TDC, EDC – BIOS Path: BIOS > Advanced > AMD CBS > NBIO Common Options or Precision Boost Overdrive
For AMD Ryzen 5000 and 7000 series, use PPT (Package Power Tracking) as the main control. Recommended exact values: For a 65W part like Ryzen 5 7600, set PPT 76W, TDC 60A, EDC 90A. For a 105W part like Ryzen 7 7700X, set PPT 142W, TDC 110A, EDC 170A. For Eco Mode on any 105W chip, set PPT 88W. Lowering PPT by 15% to 25% drops temperatures by a large margin while gaming performance stays consistent because games rarely need full all-core power. To adjust, enter BIOS, go to Precision Boost Overdrive, set PBO to Advanced, set PBO Limits to Manual, enter PPT/TDC/EDC values, F10 to save.
CPU Undervolting – BIOS or Software Path
Intel: In BIOS > Overclocking > Voltage Configuration, set CPU Core Voltage Offset to -30mV as a safe starting point with a range of -25mV to -50mV. AMD: In BIOS > Precision Boost Overdrive > Curve Optimizer, set to All Cores Negative 15 as a starting point with a range of -10 to -30. The trade-off: Undervolting lowers power consumption and lets the CPU boost higher within the same power limit, but too much offset causes crashes under load. Stability test with Cinebench R23 multi-core for 10 minutes and one hour of your most played game. If it crashes, reduce offset by 5mV or 5 steps.
Windows Power Mode – Path: Settings > System > Power > Power mode
Set desktops to Best Performance and gaming laptops to Balanced. Best Performance prevents Windows from aggressively parking cores or limiting boost when on AC power. On laptops, Balanced allows the OEM power profiles and NVIDIA WhisperMode or AMD SmartShift to manage battery and thermals correctly. This setting does not directly change PL1/PL2 but determines whether the OS will respect or override your BIOS limits.
Frame Rate Limiter – Path: NVIDIA Control Panel > Manage 3D settings > Max Frame Rate or AMD Software: Adrenalin Edition > Gaming > Graphics > Frame Rate Target Control
Set Max Frame Rate to 141 for a 144Hz display, 237 for 240Hz, or 117 for 120Hz. Pair with V-Sync Off and NVIDIA G-Sync or AMD FreeSync On. The trade-off: Capping frames prevents the GPU from running at 100% power to render unnecessary frames, which lowers average power draw by a noticeable amount in menus and less demanding games. Without a cap, even a 90% power limit will be constantly maxed out.
By Hardware Tier
Low Tier – Entry 1080p (e.g., Intel Core i3-12100F / Ryzen 5 5500 + RTX 4060 / RX 7600, 550W PSU, stock cooler)
On this tier the cooler and PSU are the limit, so efficiency matters most. Set GPU Power Limit to 90% to 95% and Temp Limit to 83°C. Set Intel PL1 to 58W and PL2 to 75W, or AMD PPT to 76W. Enable Eco Mode if available in BIOS > Precision Boost Overdrive > Eco Mode. Keep case fan curve at 40% at 50°C ramping to 70% at 75°C. This configuration prevents the stock cooler from hitting 95°C to 100°C in sustained gaming and stops the PSU from running near its limit, with no perceptible loss in 1080p high settings.
Mid Tier – Balanced 1440p (e.g., Core i5-14400F / Ryzen 5 7600X + RTX 4070 Super / RX 7800 XT, 650W to 750W PSU, tower air cooler or 240mm AIO)
This is the sweet spot for tuning. Set GPU Power Limit to 95% to 100% and try a modest undervolt: In MSI Afterburner press Ctrl+F to open Curve Editor, drag the 975mV point to your target boost clock (for example 2610 MHz), press Shift+Drag to flatten the curve after that point, click Apply. Set CPU PL1 to Processor Base Power and PL2 to 1.25x PL1, or AMD PPT to stock spec. Add a -30mV CPU offset or Curve Optimizer Negative 15. Cap frames to just below refresh rate. This keeps the tower cooler quiet while maintaining full 1440p high-refresh performance.
High Tier – Enthusiast 4K / High-Refresh (e.g., Core i7-14700K / Ryzen 7 7800X3D + RTX 4080 Super / RTX 4090 / RX 7900 XTX, 850W+ PSU, 360mm AIO or custom loop)
High-end cards benefit from more headroom but still waste power if unlimited. Set GPU Power Limit to 100% for daily gaming and only use 105% to 110% for competitive or overclocked sessions after confirming cooling. Set Temp Limit to 86°C. For Intel K-series, you can use PL1 125W to 253W and PL2 253W if cooling allows, but for quieter gaming set PL1 to 125W and enable Intel Adaptive Boost Technology to Auto. For Ryzen 7 7800X3D, do not use Curve Optimizer beyond -15 and leave PPT at 120W max due to 3D V-Cache sensitivity; prioritize temperature over wattage. Use Intel XTU at C:\Program Files\Intel\Intel XTU or AMD Ryzen Master to test profiles without rebooting, then mirror stable values into BIOS.
Common Mistakes
1. Setting Power Limit to Unlimited in BIOS and Forgetting Temp Limit
What causes it: Enabling Multi-Core Enhancement or setting PL1/PL2 to 4096W on ASUS, MSI, or Gigabyte boards removes Intel safeguards and lets the CPU draw power until it hits 100°C.
How to check: Enter BIOS and look at CPU Power Management Control. If PL1 and PL2 show 4095 or Unlimited, or HWINFO64 shows Package Power exceeding PBP by more than 50% while gaming, you are in unlimited mode.
What to do: Set PL1 to your CPU’s PBP, PL2 to 1.25x PL1, set Core Current Limit to Intel spec, and set CPU Thermal Throttle to 90°C. Save with F10.
How to undo: In BIOS press F5 or F6 to Load Optimized Defaults, then F10 to save. Re-enable XMP/EXPO after resetting.
2. Lowering GPU Power Limit Without Adjusting Fan Curve or Voltage Curve
What causes it: Dropping Power Limit to 70% to 80% without linking Temp Limit or editing the voltage curve causes unstable clocks as the card bounces between power and voltage limits.
How to check: In MSI Afterburner, if Power Limit is 80% but Temp Limit is still 83°C and unlinked, or if GPU-Z shows PerfCap Reason as Pwr and VRel alternating, the setting is misconfigured.
What to do: Check Link between Power Limit and Temp Limit, set Power Limit to 90% minimum for gaming, open Curve Editor with Ctrl+F, and apply a flat voltage point instead of a deep power cut.
How to undo: In MSI Afterburner click the Reset arrow icon and click Apply to restore default power and temp limits.
3. Using Windows High Performance or Ultimate Performance on a Gaming Laptop
What causes it: Selecting High Performance forces constant high clocks and disables OEM dynamic power sharing between CPU and GPU, causing higher heat and lower sustained GPU power.
How to check: Go to Settings > System > Power > Power mode. If it shows Best Performance with the laptop on battery or a custom Ultimate Performance plan via Control Panel > Hardware and Sound > Power Options, the OS is overriding firmware.
What to do: Switch to Balanced, then open your OEM control center (e.g., Lenovo Vantage, ASUS Armoury Crate, Dell Alienware Command Center) and set Thermal Mode to Performance or Balanced. Let the OEM handle PL1/PL2 and GPU Dynamic Boost.
How to undo: In Power Options select Create a power plan and choose Balanced, or run powercfg /restoredefaultschemes in Command Prompt as administrator.
4. Applying an Aggressive CPU Undervolt That Crashes Only in Games
What causes it: An offset of -80mV or Curve Optimizer -30 passes Cinebench but fails in light gaming loads where single cores boost higher and need more voltage.
How to check: Event Viewer > Windows Logs > System shows WHEA-Logger ID 18 or 19, or games freeze with no blue screen. HWINFO64 shows core effective clock dropping to zero on one core before crash.
What to do: Reduce offset to -25mV or Curve Optimizer to -10. For AMD, switch Curve Optimizer from All Cores to Per Core and raise the two best cores by 5 steps. Test again with 30 minutes of gaming, not just synthetic stress tests.
How to undo: In BIOS set CPU Core Voltage Offset back to 0 or Auto, or in Ryzen Master click Reset. For Intel XTU click Default in the profile.
FAQ
Should I raise GPU power limit above 100% for better gaming fps?
Only if your GPU is power-limited and your cooling has headroom. In most games, raising from 100% to 105% or 110% adds extra heat and fan noise for a clock increase that does not translate into a meaningful fps change. Check GPU-Z PerfCap Reason during gaming. If it consistently shows Pwr and your GPU temperature stays below 75°C with fans below 70%, you can try 105%. Otherwise keep 95% to 100% for the best noise-to-performance ratio. To revert, set the slider back to 100% in MSI Afterburner and click Apply.
Will lowering CPU PL1 and PL2 hurt 1% low fps and cause stutter?
Not if you keep PL1 at or near Processor Base Power. Games use burst loads that depend on PL2 and Tau, not sustained all-core wattage. Stutter appears only when PL1 is set too low (for example 35W on a 125W chip) or when current limits are also reduced. Keep PL2 at 1.25x PL1, leave Tau at default 56 seconds for Intel, and do not lower ICCMAX below Auto. Monitor with HWINFO64 Sensors for Power Limit Exceeded flags while gaming.
Where do I save and edit power limit profiles so they persist after reboot?
GPU: Save in MSI Afterburner to Profile 1 to 5, then enable Start with Windows and Apply overclocking at system startup via Settings > General. Config file is located at C:\Program Files (x86)\MSI Afterburner\Profiles\MSIAfterburner.cfg. CPU: Save in BIOS after pressing F10. Software tools like Intel XTU (C:\Program Files\Intel\Intel XTU) and AMD Ryzen Master (C:\Program Files\AMD\RyzenMaster) are for testing only and require Apply on each boot unless you transfer values to BIOS. For NVIDIA, profiles can also be saved in C:\ProgramData\NVIDIA Corporation\Drs\nvdrsdb0.bin via NVIDIA Profile Inspector but Afterburner is more reliable.
How do I know if my power limit is actually being hit during a game?
Use monitoring overlays. What causes the limit: GPU hits power or thermal cap, or CPU hits PL1/PL2. How to check: Enable MSI Afterburner OSD via Settings > Monitoring > Show in On-Screen Display for GPU Power, GPU Temperature, CPU Package Power, CPU Temperature. Or use HWINFO64 Sensors and look for Yes in GPU Power Limit or CPU Package Power Limit rows. You can also press Alt+R for AMD overlay or Alt+Z for NVIDIA overlay to see wattage live. What to do: If power limit is constantly Yes and temps are low, you can raise power limit slightly. If Yes and temps are high, improve fan curve or lower power limit instead. How to undo monitoring changes: Uncheck Show in On-Screen Display in Afterburner monitoring settings.